Add a new job
Last updated: October 27, 2026
In this article, you will learn
______________________________________________________________________________
Short tips
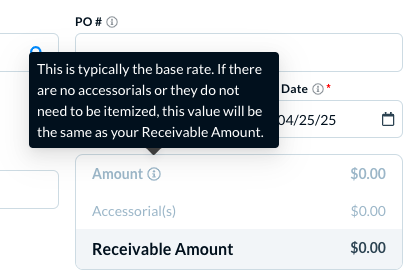
For different entities and information types, Denim shows you an info icon for related information or for context, for your reference. For example the info icon for the Amount shows it as below.
______________________________________________________________________________
Option to add a new job
There are two options to add a new job.
On Dashboard
Click on Dashboard in the navigation. Click on the Add Job button.
In the jobs list
Click on Jobs in the navigation. In the expanded view, click on Job Board.
Click on the Add Job button to add a new job.
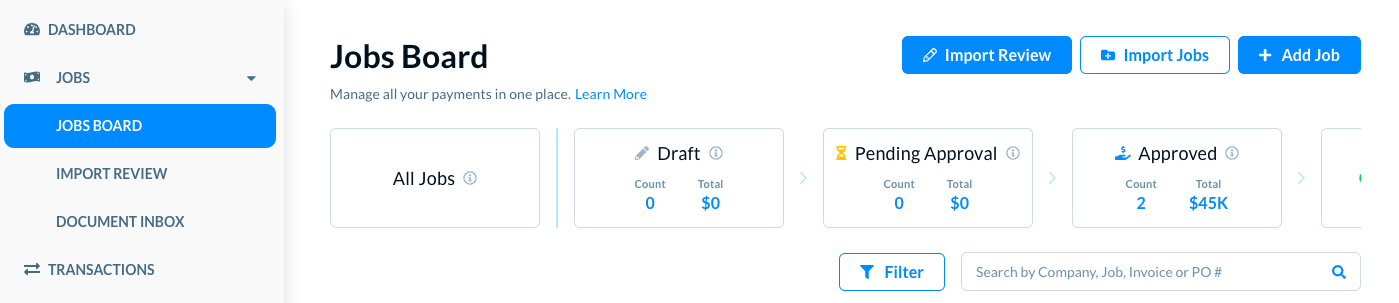
The Job Details page opens.
______________________________________________________________________________
Job details
Add the basic details of new job.
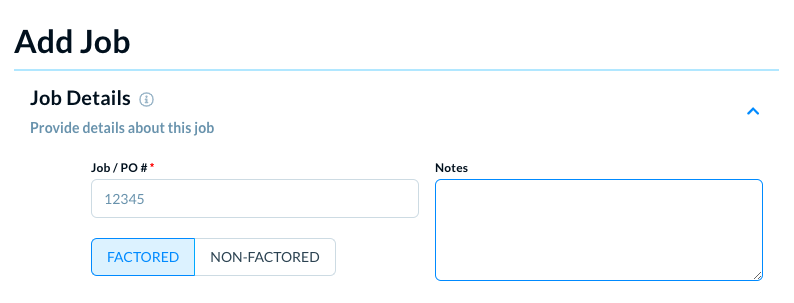
In Job/PO#, write the unique Job number of PO number for this job. This number is ....
Select whether this job is Factored or Non-Factored.
Factored:
Non-Factored:
In Notes, write a note that describes this job for your internal reference. For example you have charged the contractor, or if the QuickPay fee is already paid to them.
______________________________________________________________________________
Invoicing a customer
In Invoicing a customer, provide the billing details, including the invoice date and collection dates, the receivable amount, adding accessorials, and adding attachments for the invoice.
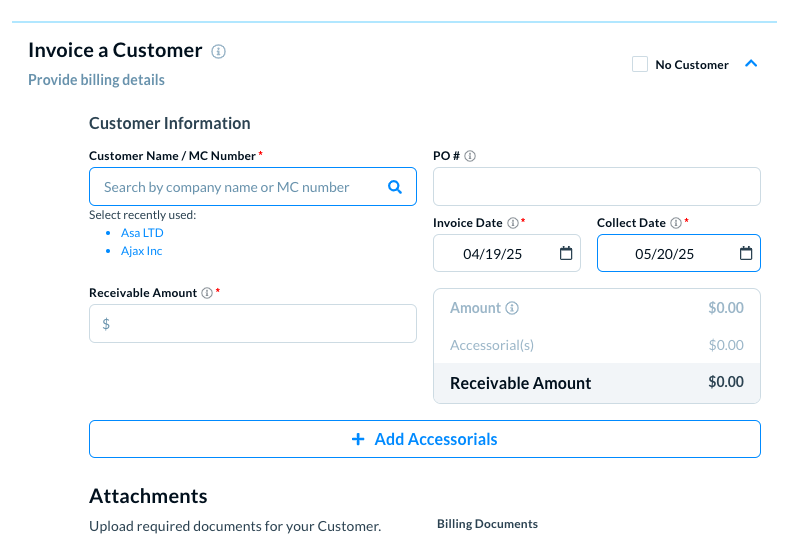
In Customer Name/MC Number, write the name of customer, or their MC Number. As you start writing, Denim shows you the pre-listed customers as below.
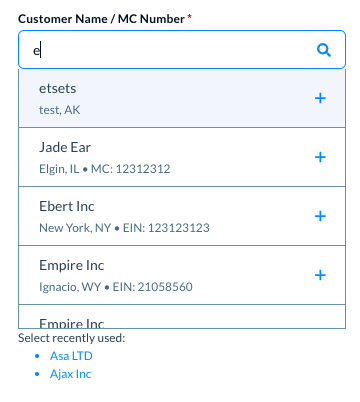
Select the exact customer/debtor profile in the list. When similarly named profiles are available, choose the profile for the entity responsible for paying this load and verify its identifying details before submitting the job. If the job is already submitted and the wrong profile is attached, contact Support to review the job; do not create or merge profiles to correct the attachment.
Add a new customer relationship: If the customer already exists in the Denim database.
Add a new company: If the customer is not listed in the Denim database. In this case, Denim verifies the customer before approving this job.
If they already existing in Denim's database, or add a new company. (Context: Depends on the integrations and settings...., and see related article)
The Select recently used list shows you a few customers that you might have used recently for some jobs. Select a customer if it shows in this list.
In PO#, write the unique PO# for this customer, for this job. This customer will associate this job with this unique PO#.
In Invoice Date, select a date when you want to invoice this customer for this job.
In Collect Date, select a date for the collection for this job. Denim begins collections for this job after this date.
In Receivable Amount, enter the amount that Denim will bill to and collect from this customer. It includes the accessorials and other fees that you are charging from the customer.
💡Note: The Collect Date cannot be earlier than the Invoice Date.
________________________________________________
Setup accessorials for invoicing the customer
In the invoicing details, you can add and manage accessorials for this new job. Click on Add Accessorials, and you can add the description and the cost of each accessorial.
When you add accessorials, the Receivable Amount is automatically updated, as you can see above. (Please see Setup accessorial fees to customer invoices for details.)
________________________________
Add and manage attachments
Add one or more attachments for this job invoice.
In Attachments section, click on the Browse files link and locate the files that you want to attach. Click on the link again to upload more files.
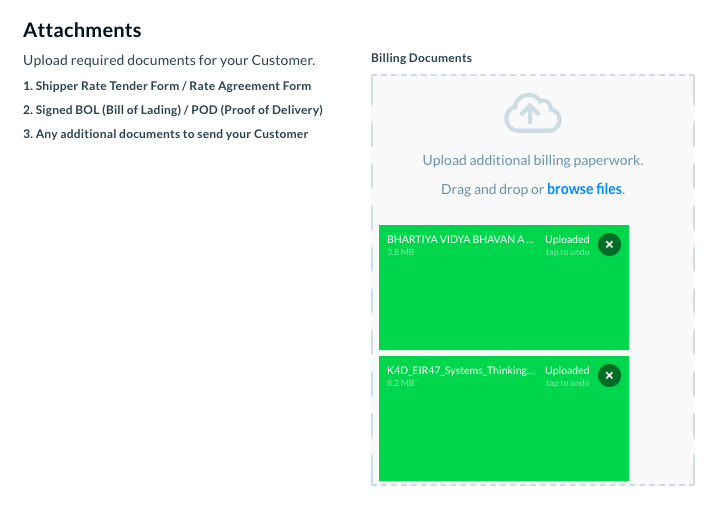
Non-factored invoice packages: If you want your own customer invoice sent with the Notice of Assignment (NOA) and billing package instead of the platform-generated invoice, upload it as a document when submitting the job. Then contact Support to review whether the debtor-specific invoice-package settings can include your uploaded invoice and exclude the platform-generated invoice. This configuration is not available for every debtor or job type unless Support confirms it.
(Please see Paperwork requirements—billing and supporting documents for more details.)
______________________________________________________________________________
Pay a contractor
Special use case: No contractor
If there is a use case that you do not have a contractor for this job, select the No Contractor box. For example if you want to create a payable-only job, select this checkbox to hide this section.
Now you can skip adding the contractor details to move to the next sections.
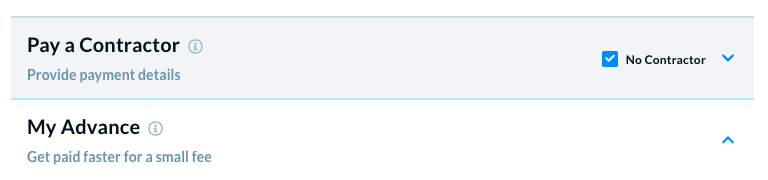
💡 Note: If you have a use case to create many payable-only jobs, you can define the global payable-only settings for all jobs. In this case, this job form shows the No Contractor checkbox selected by default. You can clear this box in the form, if required. (See Preferences: Set no payables in the jobs for the detailed instructions.)
_________________________
Add contractor details
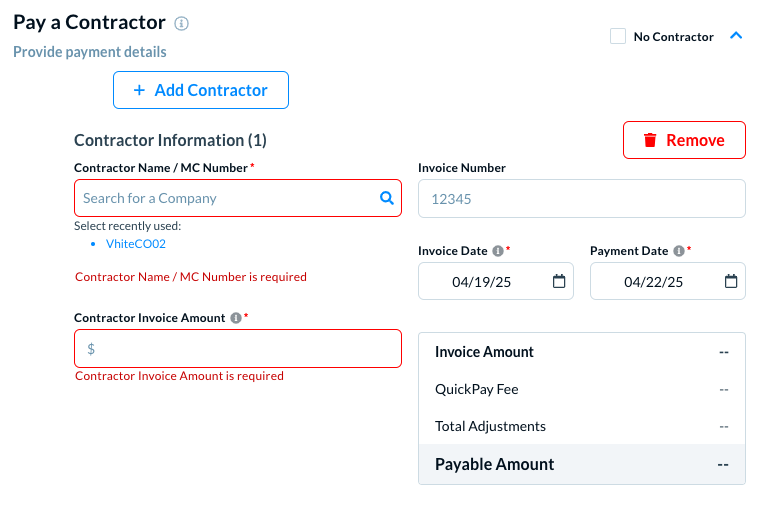
In Pay a Contractor, add one or multiple contractors for this job. For example you can create a job to pay multiple contractors for this job.
Contractor Information (1)
In this section, you can add the first contractor's information.
For example add the contractor details, the invoice number, the invoice date and payment date, the invoice amount. You can also add and manage adjustments and the attachments for this contractor reference.
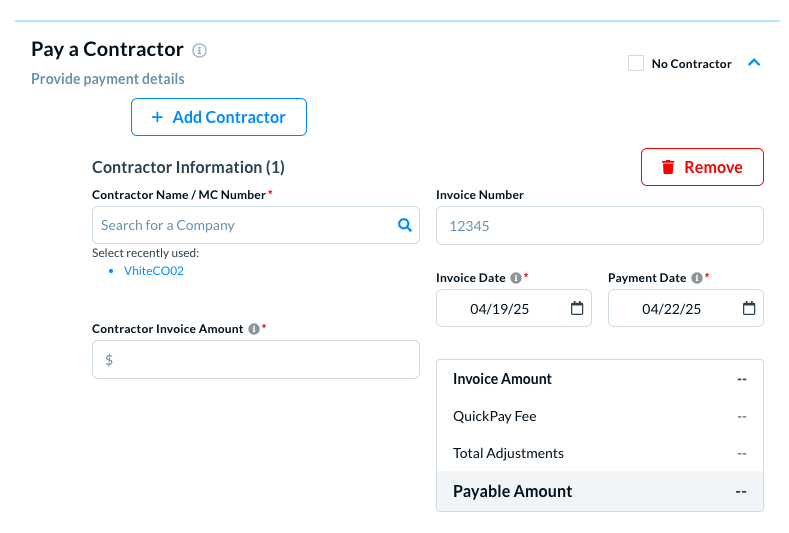
In Contractor Name/MC Number, write the name of contractor, or their MC Number. As you start writing, Denim shows you the pre-listed contractors.
Select the required contractor in the list. If this is your first time you are working with this contractor, you have two options.
Add a new company: If the contractor is not listed in the Denim database. In this case, Denim gives you an option to add a new contractor. (Please see Add a new contractor for details.).
If company already exists in Denim: The Select recently used list shows you a few contractors that you might have used recently for some jobs. Select a contractor if it shows in this list.
In Invoice Number, write the unique invoice number for this contractor, for this job. When entered in the Contractor section, this carrier invoice number can appear on the remittance. Remittances are automated and cannot be customized, so enter the correct number when setting up the job; Support cannot promise a retroactive or manual change to an already-generated remittance.
In Invoice Date, write the date when you want to invoice this contractor, for this job.
In Payment Date, select a date for contractor's payment. (Please see Set up contractor payment dates for more details.). If this is a Factored job, the nearest possible date is automatically selected as the payment date. Jobs that are submitted before 12pm ET are paid on the next business day, and the jobs that are submitted after 12pm ET are paid in two business days. (Please see Payments: Cutoff Times for details.)
In Contractor Invoice Amount, write the invoice amount for this contractor, for this job. Note that if you add more contractors for this job, plan this invoice amount carefully.
Validation Error: If the amount you enter doesn't match the contractor's invoice documentation, Denim will flag an error stating "Carrier payable amount doesn't match with carrier invoice." To resolve this discrepancy, you must either upload an updated contractor invoice that matches the entered amount, or provide comments/confirmation from the contractor approving the different rate.
Add more contractors
There might be cases when you want to invite multiple contractors to the same job. In this case, click on the Add Contractor button.
Another contractor form shows where you can add the contractor details by following the same steps as you used for the first contractor.
💡Note: If you do not select the No Contractor box, adding the contractor details is mandatory to save the new job. If you do not add the required, details, Denim alerts you to add these details.
Add and manage adjustments
In the contractor details, you can add and manage adjustments, if any, for this new job. For example there might be some payment adjustments for extra pass, or overtime by the staff, or packaging cost.
In the Adjustments section, one default entry is already mentioned for QuickPay. (Please see QuickPay Overview for details)
Click on Add Adjustment, to enter a new adjustment entry.
Write the adjustment description and the amount in the respective fields.
Add: Click on Add Adjustment to add a new item.
Delete: Click on the Delete icon corresponding the adjustment that you want to delete.
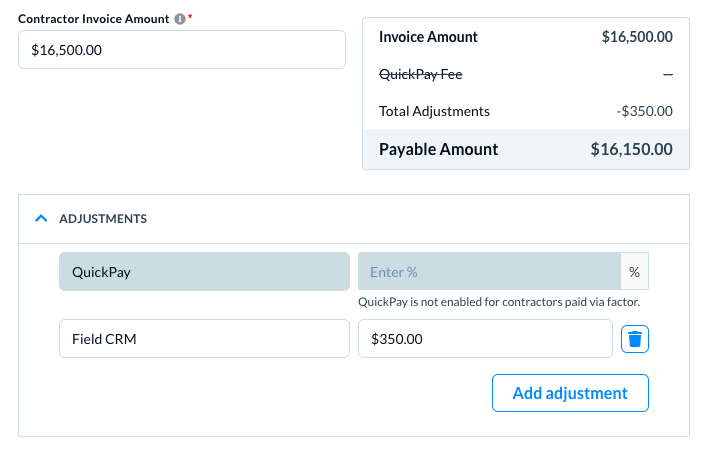
When you add adjustments, the Payable Amount is automatically updated, as you can see above.
Add and manage attachments
Add one or more attachments for this contractor and the amount payable.
In Attachments section, click on the Browse files link and locate the files that you want to attach. Click on the link again to upload more files.
______________________________________________________________________________
My advances
In My Advances, set the amount that you want to get paid in advance. This advance payment is based on the Factoring Rates settings in your account. If you have questions about the Factoring Rates, contact your account owner.
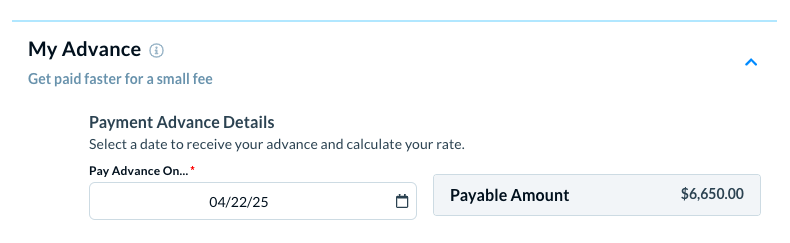
In Pay Advances On, select the date when you want to receive an advance. The dates are available within a specific range of dates within the invoice date.
The Payable Amount automatically shows depending on the Receivables and the Payables in this job.
Conditions when advances are not available
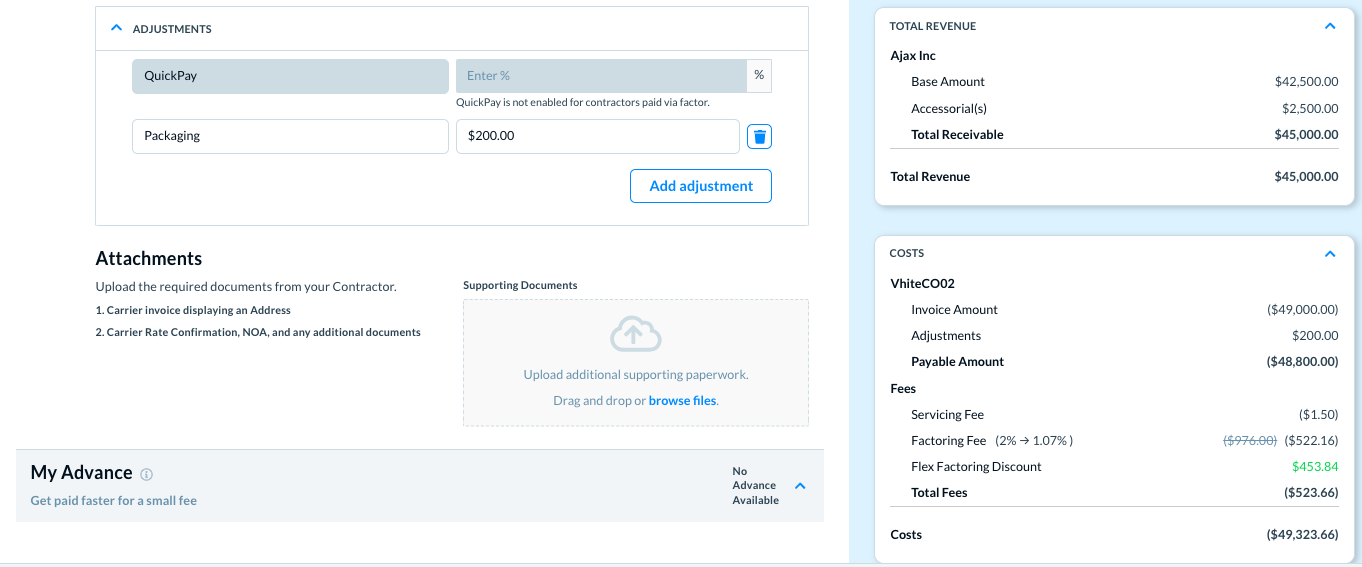
As you enter the amounts for the Customers and the Contractors, Denim shows a summary of cost and the revenue in the right side. If your Receivable Amount is more than the Payable Amount, the advances option is not available, for example as below.
______________________________________________________________________________
Save as Draft or Submit for Approval
After you complete all the required details for this new job, you have two options.
_________________
Save as a draft
Click on the Save Draft button to save the job as a draft. It is not submitted to Denim for approval. You can use this option to save as draft and submit it later if you want to add or change any information in the job details, invoicing, dates, or adjustments.
Once you submit it for approval, you can change only selected parts of the job. See the following section for more details.
💡 Note: Even if you have submitted a job for approval, you can edit it if the status is Pending.
_______________________
Submit for funding
Click on the Submit for Funding button to submit the job for approval. The Denim IT team reviews each job for its details, and approval is not guaranteed.
Carrier invoice requirement: A customer billing invoice does not substitute for the carrier/contractor invoice required before approval. Provide the carrier invoice before requesting approval. Customer invoicing may be available earlier in the workflow, but invoicing your customer and getting the job approved are separate steps.
Denim takes you to the Job Board where you can see the recently created job at the top in the list. (Please see Job Board—see and manage jobs list for more details.)
If the job is approved but the contractor payables are yet not paid, you can edit the payables in such cases. (Please see Edit payables for approved jobs for more details.)
______________________________________________________________________________
About documents and notes
When you add a new job and save it as a draft of submit it, two new sections appear in the job details.
Documents: See Add and manage job documents for details.
Notes: See Add and manage notes for details.
______________________________________________________________________________
Actions after creating a job
For a job with status as Draft
When you save a new job as a draft, there are two primary actions in the job details.
Locate the job in Job Board. Click on the job to see its details.
Delete: Click on the Delete button to delete this job. Denim asks you to confirm if you want to delete this job. Confirm it to delete the job.
Edit: Click on Edit to edit the job details. See Manage job details for more details.
Submit for Funding: Click on the Submit for Funding button to submit the job for approval. The Denim IT team reviews each job for its details.
_____________________________________________
For a submitted job with status as Pending
If a job's status is Pending for Approval, you can take following actions in the job details.
Locate the job in Job Board. Click on the job to see its details.
Delete: Click on the Delete button to delete this job. Denim asks you to confirm if you want to delete this job. Confirm it to delete the job.
Revert to Draft: Click on the Revert to Draft button to revert the job status to Draft. It means that the job will not be available for approval anymore, in the Draft status.
_______________________
For an approved job
If a job is approved, you can edit very little information in its contractor details. See Edit a job for more details.
______________________________________________________________________________
Support-assisted invoice and job corrections
The following corrections require Support to review the particular job. Do not assume that a displayed credit, payment status, job status, or matching paperwork confirms factorability, eligibility, approval, funding, collection, or payment.
Factored job appears not factorable: First verify that the job is attached to the intended customer/debtor profile. A duplicate or incorrect profile can cause the discrepancy even when a credit line is displayed. Contact Support if the profile is wrong. In a reviewed case, Support advised reverting the job to Draft, removing the incorrect customer, recreating the job with the correct profile and matching paperwork, and resubmitting it for funding review. Do not delete or merge company profiles to resolve this issue.
Factoring type cannot be changed after submission: Contact Support to review the job and advise on an available correction. Eligibility and the remedy require job-specific review; do not rely on a notice or state a universal age cutoff.
Profile correction leaves a load in Draft: If Support confirms that it corrected the carrier or customer profile and that the affected load is in Draft, review the load and resubmit it for funding review. Draft means the load is not currently submitted for approval. This does not guarantee approval or funding, and not every profile correction leaves a job in Draft.
Carrier identity or name mismatch: Do not create or merge contractor profiles based only on a mismatch. Contact Support to review the existing record. After Support confirms its correction and directs resubmission, review and resubmit the load. Do not assume the load is Draft or that processing, approval, or funding is complete.
Submitted job has an advance and the billing customer or broker is wrong: Contact Support. If Support confirms this correction path, Support coordinates reversal of the advance, then rejects the job. After Support confirms rejection, make the required changes. Do not reverse the advance yourself or delete the job when the intent is correction; this differs from cancellation.
Non-factored job should be factored: If a submitted job cannot be edited or deleted, contact Support. For a reviewed duplicate-job case, Support rejected the non-factored job and advised deleting and re-entering it as factored. Follow that direction only if Support gives it for your job; it does not guarantee eligibility, credit, approval, funding, or payment.
Approved job was paid directly to the carrier: If you cannot delete the approved job, contact Support for review. In a reviewed case, Support rejected the job and then directed the customer to delete and rebuild it in the portal. This is not the ordinary initial prepaid-job workflow and does not guarantee approval or payment of a rebuilt job.
Factored job should be non-factored: If a submitted or approved job cannot be edited, contact Support. If Support confirms that rejection is available, follow its direction to reject and recreate or re-enter the job as non-factored. Do not reject the job yourself or treat wording about terms or age as a universal cutoff.
Payment appears paid and a second job uses the same paperwork: Ask Support to verify which job the payment is associated with and whether the second submission is a duplicate. Only if Support confirms the duplicate and directs removal should you delete it. A payer portal status, matching amount or paperwork, or a customer assertion alone does not verify a duplicate. Deleting a job does not change or reapply a payment.
Approved job has the wrong customer receivable amount: Contact Support to review it rather than assuming you can edit or reject it. In a reviewed case, Support rejected the approved job and directed resubmission with the amount supported by the rate confirmation. This does not establish that every approved job can be rejected or that resubmission guarantees an outcome. Customer receivable corrections are separate from contractor-payable edits.
Missing customer contact information: Provide the current customer contact email and phone number to Support for the customer record. Review and resubmit the affected job only after Support confirms the information was added. This does not confirm submission, approval, or funding and is separate from a collections-contact warning.
Several loads were rejected for duplicate paperwork: If Support confirms that the same paperwork was submitted for different loads and directs deletion and resending, follow that case-specific instruction. For each affected load, send the paperwork that belongs to that load. Do not assume duplicate paperwork caused every rejection or delete a job without Support's confirmation.
Completed job has no customer and the carrier payable was paid out: Contact Support to review the job state and payout conditions. In the reviewed circumstance, Support advised creating a new non-factored job with no carrier payable, attaching only the customer, and using a job number that references the original, such as by appending “-1”. The prior carrier payable had been funded from the account's Denim Cash balance; once the customer's payment is received, it is deposited to that balance. This does not guarantee approval, payment, or immediate credit for the new job.
Wrong debtor profile routes an invoice to the wrong billing contact: Before submitting, select the exact debtor profile for the entity responsible for paying the load, especially when profiles have similar names. If a submitted job is attached to the wrong profile, contact Support to review the attachment. Do not assume you can move the submitted job or change profile records, or that an invoice has been rerouted, until Support confirms it.
A few questions and answers
Q: My job is not approved. Where I can follow up if I have questions?
A: Please see Why my job is pending for details.
Q: Can I import a few jobs from a CSV file?
A: Yes, please see Bulk Import Jobs: from CSV for the detailed steps.